Posted on

How to remove password from ECU

So you’ve forgotten your Password on your ECU. We’ve all been there…

This article isn’t about why your ECU has a password on it, nor is it an invitation to discuss why or who might have put the password on it. We are open to discussions about how to better secure passwords on ECUs and other techniques on how to recover passwords off ECUs though.

This article is about the nuts and bolts around how to recover the password off a locked ECU.

Today’s subject is the LinkECU G4 series of ECUs, a very popular ECU for good reason, it ticks a lot of boxes for a lot of people. 

Link G4 Password Removal Process

So to begin the password recovery you will need:

  1. A PC with PC Link G4 installed on it.
  2. Some form of spreadsheet software (Google sheets or Excel)
  3. “Notepad ++” software installed

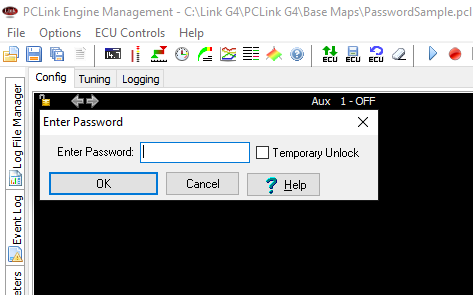
So because this article is strictly for entertainment and education purposes, and never to be used for any actual password recovery in the wild, we’ll begin by opening PCLink G4, opening a new base map, lock it with a password, and “Save As” new file name.

Now we’ve got our password protected calibration file to try and recover the password from.

Next up we’ll close PCLink and open our new calibration file in Notepad++ and what we’re greeted with is a wall of numbers, not quite human readable but not encrypted by any means.

Looking a Link G4 calibration file in Notepadd++

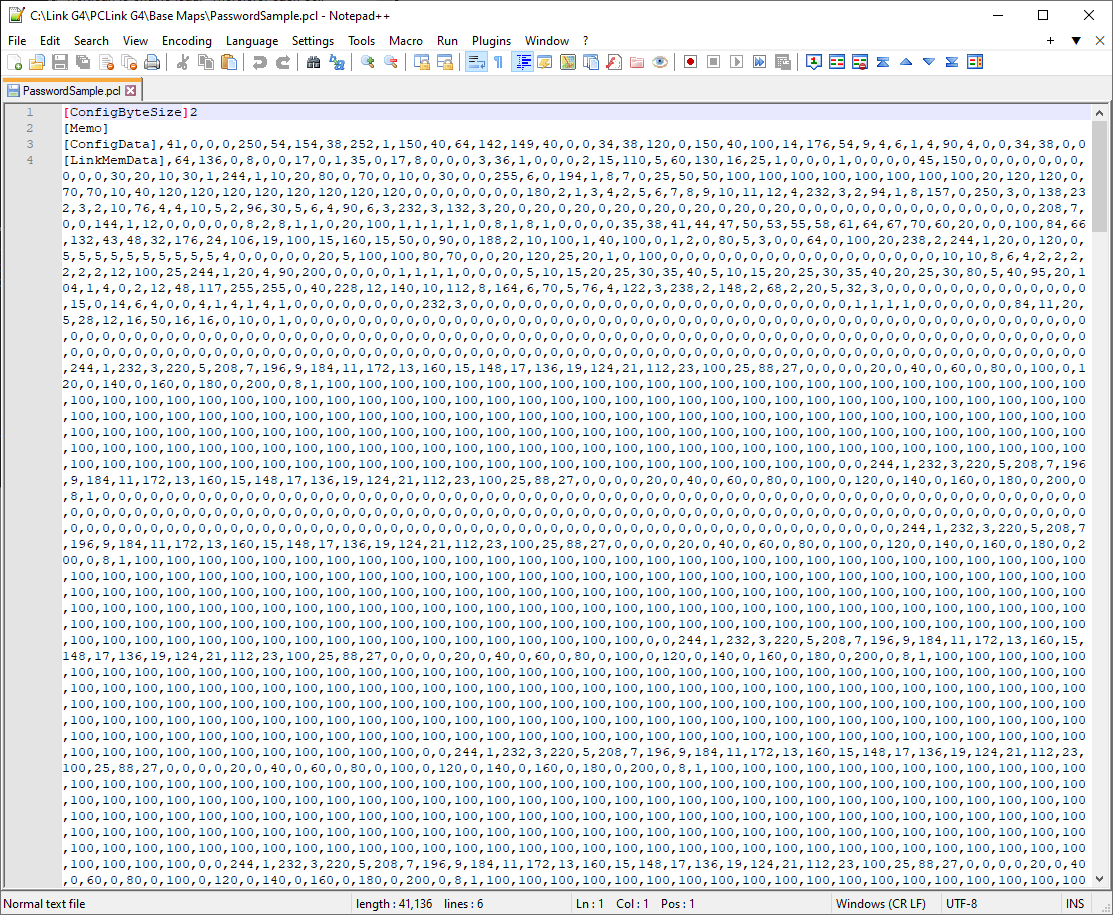
So you can search through these 40 thousand numbers to see if your password is in there, and at first glance it’s not there; only numbers. So where is the password? Oh it’s in there, you just need to read like a computer. The password is stored in ASCII. ASCII (American Standard Code for Information Interchange) is a character encoding system that represents text and symbols in digital devices using a 7-bit or 8-bit code.

So now we’re talking bits and bytes, but what you might have noticed in the notepad file while you were looking for your password, none of the values between the commas were below 0 or above 255. Every value between the commas is an 8-bit value, expressed in the notepad document in decimal format. (0-255) We’ll get into the differences in Binary, Decimal and Hexadecimal in another CANbus article, for now though let’s proceed and get someone else do the heavy lifting in the brain department.

We need to dump all this information into a spreadsheet and use the formula =CHAR() to find our password.

If we just copied all the data out of the LinkMemData line into our spreadsheet, each comma would make a new column, which at 14,119 would violate the maximum amount of columns you can have in a spreadsheet, so we need to transpose the data into rows before we send it into our spreadsheet.

To do this we’ll use the find and replace feature in notepad++ and replace every comma with a line break.

make sure that extended button is pressed

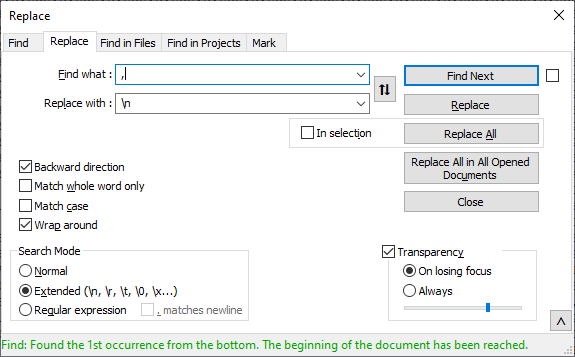
Finding commas, replacing it with \n, making sure the extended button is enabled, the hit replace all. This takes a second, then you’ll see you’ve got one line per number, now select all of it, and paste it into your spreadsheet.

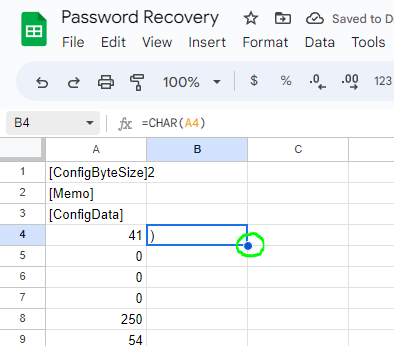
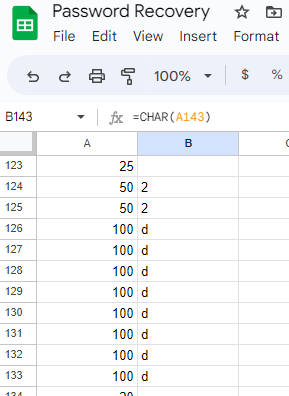
Now with all your data pasted into your spreadsheet, you should have it all in one column, and one value per line. In a cell that’s adjacent to a number value enter the formula 

=CHAR(A4) 

Decimal to ASCII Conversion

Where A4 is the cell which has the number value in it. Then Press Enter. Your spreadsheets software might suggest an auto fill which is to do the same formula all the way through which is perfect. If it doesn’t suggest it, you can double click on the little dot in the bottom right of the cell where your formula is.

Extend the formula down to the bottom

This will continue your formula down all the way to the bottom of the table.

So now you might be seeing some letters in here with some human readable text!

Numbers converted from Decimal to ASCII

I’ll give you the tip, my password wasn’t 22dddddddd. So let’s keep scrolling. Scrolling, scrolling, scrolling… scrolling forever, until your mouse wheel has given up and you’ve had to swap hands lest you do yourself an injury, continue scrolling, making sure to read every letter, it might be your long lost password, keep scrolling down, hoping you haven’t missed it…

But then, you’ll see it, a string of letters, albeit vertically aligned, it’s unmistakable, and one of the best words you’ll see all day.

A word so unmistakably amazing, it evokes sweet and lustful emotions in most, promotes salivation and a desire to consume.

You’ll find this word held in the highest regard by people all over the world, its beauty and brilliance crosses all cultures and borders.

The word found on the 9784th line of this spreadsheet means a lot to me, means a lot to you.

Delicious dairy treat, a yellow kind of meat.

So here is your password! Congratulations! 

Make sure you use this information for good and not evil.

Also if you can’t be bothered with the Notepad++ or Spreadsheet, you can just ask chatGPT if it can see any ASCII words in the file you point it at.

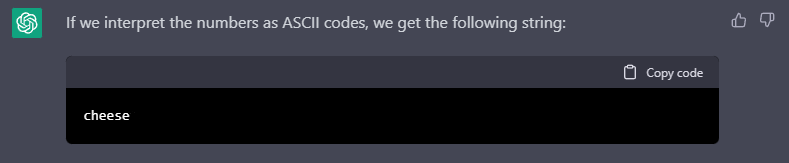
Yep, we’re all doomed.

So this technique works for the Link G4 and other ECUs of a similar vintage.

Later model standalone ECUs make it a little more difficult to get the passwords out, they will encrypt the calibration files and hash the passwords which significantly increases the difficulty of recovering the passwords out of them. We’ve got other techniques for recovering those passwords which we look forward to sharing with you later.


If you liked this article, consider subscribing to our mailing list to get more juicy, nerdy, racecar articles delivered straight to your inbox.

Subscribe

* indicates required

Related products

  • CANbus Shift Light - Digital Download
    CANbus Shift Light – Digital Download
  • Arduino Nano - CANbus shift light project - Hardware kit
    Arduino Nano – CANbus shift light project – Hardware kit
  • Flush cut side cutters
    Flush cut side cutters
  • Open Barrell Splice kit with crimping pliers
    Open Barrel Splice Kit – With Crimping Pliers
  • USB-CAN Interface
    USB-CAN Interface
  • Deutsch 47 Pin Bulk Head Connector Kit
    Deutsch 47 Pin Bulk Head Connector Kit
Posted on 1 Comment

LinkECU with Haltech IC7 – Getting the warning lights working

We’re working on a customers car today, installing a Haltech IC7 to work with a Link G4X XtremeX, at first glance it’s not a particularly challenging installation, but as usual; we found a challenge for ourselves that introduced a twist.

Upon setting up the IC7, we set it up in Link G4 Mode and set the Link ECU to output the generic CAN stream to suit, now we’re in business. Upon first powerup, all was going well, all the sensors were coming through as expected but on some screens, there was a glaring omission, the warning lights in the center console were not working. This is a pretty disappointing detail that’s missing from the IC7 Display when using it with a Link ECU, not being able to light up the CEL, Oil warning, Battery warning, TC or LC lights. Plus they’re just there mocking you, not working, the whole time, on most of the screens.

Default Haltech IC7 Screen, you can see the unilluminatable warning lights in the center.

So the challenge now is obvious, get these warning lights on the Haltech IC7 working with a Link ECU…

So with the Haltech IC7 there didn’t seem to be any CAN messages that would toggle the warning lights, I trawled through all the LinkECU and Haltech documentation to no avail, I found the CAN messages that ‘should’ turn the lights on, but they didn’t do anything no matter how I sent them over.

So I defaulted the IC7 back to Haltech V2, and using my ECU Master USB to CAN and the Light client software, sent the CAN messages that should toggle the lights and voilà, they worked as expected.

So let’s ask the LinkECU to send down the Haltech Dash protocol…. Unfortunately this isn’t an option. Time to dive into the Link’s Custom CAN stream settings.

So if we look at the Haltech CANbus documentation, we can see that all the lights we want to use are on the one address (0x3E4 or 996) so with 5 lights to choose from, we opted to use 4 of them. Check Engine light, Oil Pressure Warning, Battery Warning and Launch Control. 

Why Launch control? Well, this car is a GU Nissan Patrol with 4WD and it’s nice to know when you’re in 4WD. One option would be to get a pilot light and mount that in the cluster somewhere, but to save the visual appeal of the Mako Motorsport Custer we decided that it needed to go into the IC7 but how…. Launch control isn’t a feature we needed a light for on the dash as its status will be reflected on the CANkey pad, so we wired up the standard 4WD light wire (Behind the dash, white connector, White\Violet wire) that goes to the dash and routed it into one of the spare Digital inputs, this digital input is configured to a GP Input and as the 4WD switch, switches from floating to ground, we enabled the pullup resistor.

Then we set the 4WD status to go into the CAN User Stream on the right bit to light up the LC light on the IC7.

Screen shot of the LinkECU CAN Stream frame to toggle the warning lights on the IC7

So with this CAN Stream Setup, we can enjoy the fruits of our labour!

Warning lights: operational.

So you’re probably noticing the custom logo in the center and the 4WD light has replaced the standard LC Christmas tree. Stay tuned for how we complete that in another article, but for now! Back to CANbus settings.

So we’ve got the warning lights operational, but now none of the sensors work! Well the thing to do now is to write Link User CAN stream that will suit what the Dash is expecting to hear from a Haltech ECU, this seems like an arduous task but if we look at the above screen, it’s actually only 11 different sensors that actually only go across 4 CAN messages. I found it helpful to set the dash up to display what the customer wanted to see and then find those messages in the documentation, because the dash isn’t capable of any logging, there is no need to send messages for sensor data we’re not going to look at on the display.

To give you a bit of a head start if you decide to endeavor on a project similar to this, find here a zip with the Link Streams saved for your reference.
I’m going to call it mission accomplished on this project, I learned a couple of new tricks and the customer got something pretty cool.

Thanks for reading! Stay tuned for the next one!

  • 4 Port CAN Hub
    4 Port CAN Hub
    $99.00$108.18
  • CAN Checked - MFD15 52mm CAN Gauge
    CAN Checked – MFD15 52mm CAN Gauge
    $469.00
  • Open Barrell Splice Kit
    Open Barrel Splice Kit – 100pcs
    $36.00
  • Product on sale
    Blink Marine CAN-BUS Keypad (15mm)
    Blink Marine CAN-BUS Keypad (15mm)
    $479.00$600.00
  • USB-CAN Interface
    USB-CAN Interface
    $195.00
  • DTM4 Patch Lead - CAN cable
    DTM4 Patch Lead – CAN cable
    $28.90$39.41

Haltech CAN protocol documentation